Salvation's Edge
Kill the Witness, once and for all...
This is launched from very far right on the Pale Heart map.
You can find my Fireteam’s first full run through of this raid on Twitch. We had some nightmarish scheduling conflicts, hence the multiple streams and some repetition of encounters.
All Encounters are subject to a ‘The Final Shape’ or ‘Imminent End’ timer, which will wipe your fireteam once it hits 0 seconds. In general, this should be considered a maximum amount of time for a single rotation of an encounter’s mechanics, but certainly for earlier encounters you should be ready for the next rotation with about 30 seconds to a minute on the clock, at least.
Circuit Mechanic
A very common mechanic that comprises much of the raid is a circuit mechanic, in which there are two plates involved in a circuit at any given time: a ‘source’ plate and a ‘conduit’ plate, which is positioned next to a Conduit, which looks like an obelisk slightly hovering above the ground. Both plates are connected by wires which can be traced on the ground. Standing on a glowing source pad will send a pulse of energy (a yellow light) through the wire towards the conduit; once it reaches the plate, a yellow ring will appear above the conduit plate and rapidly shrink. You should stand on a plate whilst the ring is active to send the pulse back to the other plate, which will then also have a ring and you can ping the energy back and forth this way ad infinitum. Do not stand on the two plates simultaneously or you will spawn an enemy which will block the pads from being used. This may also happen if you fail to stand on the plate in time after the energy has been sent to you, but this doesn’t always seem to happen.
Each time you ping the energy back, a Resonance object will spawn nearby which can be picked up by walking over it. You can do this whilst managing a pad, as the energy travels slower on subsequent pings. There are the following energy types:
- Spherical resonance (a sphere)
- Pyramidal resonance (a pyramid)
- Hexahedral resonance (a cube)
You may hold up to three resonance at any one time before dying. Picking up another resonance type will override the entire stack into just that energy type (but preserve the number of held resonance).
Once all resonance is summoned and collected, you may conclude the sequence by charging the Conduit; to do this, you should identify which shape is shown in the glowing portion of the Conduit, and ensure that you have the correct resonance. Shoot the conduit whilst the energy is in flight towards the Conduit plate (or after sending the energy to the Source plate), and then stand on the Conduit plate as usual to conclude the charging sequence. This will despawn any unclaimed resonance which was spawned by this circuit.
Secret Deepsight Chest
In the first room when you enter the Monolith, with double stairs, there is a wall with eight columns of symbols above the stairs. You should read and note down the symbols in the 3rd column from bottom to top.
Each symbol corresponds to a hidden room with a Circuit mechanic inside, with the bottom symbol being the first room and so on, though two of the rooms will be inactive (these will contain a Resonant Altar inside stating that “You are found lacking”) and should be ignored.
You should ping the circuit back and forth to generate Resonance, and then with the correct Resonance for the room you are in (which is the Resonance that matches that room’s symbol), charge the Conduit. You should ignore the other Resonances that may be spawned.
Should you do it incorrectly, then the architecture will call for your destruction and you are locked out of the Deepsight chest for that run.
Reminder: Deepsight chests require the entire Raid to be completed without loading a checkpoint from Orbit.
Room locations:
- In the jump puzzle immediately after the above wall, it’s in a little alcove after the stairs to the left after jumping atop the giant statue.
- To the left of the Subjugator that spawns at the end of the jumping puzzle before encounter 1, it is located between the two abstract vertical staircases.
- After going up the lift after the first encounter, it’s through a grate on the right after climbing the huge green blocks to the left.
- After the grid room with many portals emitting cubes after the second encounter, there are multiple bridges with some cube-emitting portals as well. The room is in an alcove on the wall to the left.
- Just before the third encounter, in an area with many branches growing atop orange blocks, you should look up and to the left; climb the blocks to find the room.
Encounter 1: Substratum
See the following map (slightly modified from this one) for a layout of the encounter:
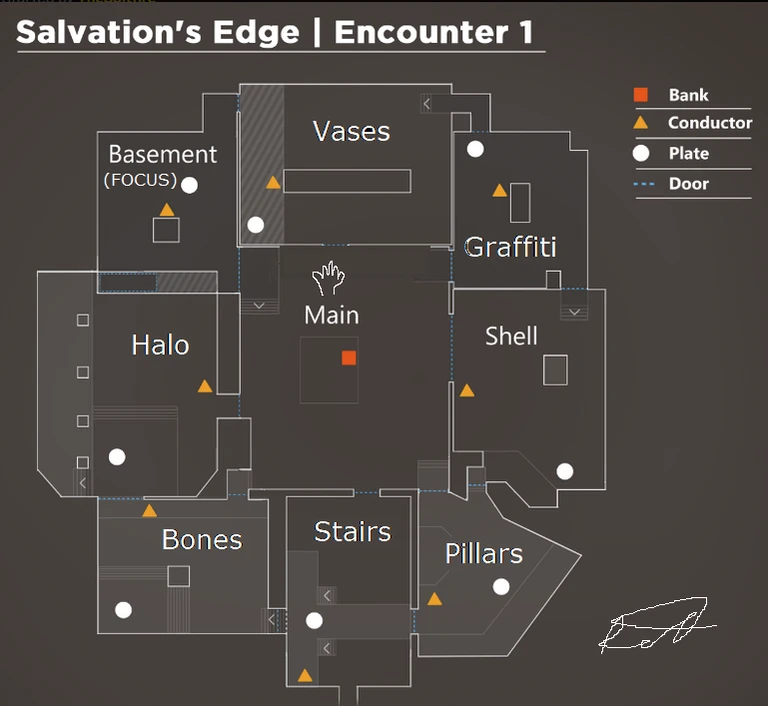

Depositing the initial Pyramidal Resonance in the Resonant Altar begins the encounter, spawning the Witness hand and many explosive shanks which come out of the newly-opened doors around the central room. The Witness hand will periodically cast a triangular AoE on a targeted player, which you should avoid being in when it explodes. Only two doors will be open, and they will be next to each other.
Split up into two teams, each entering one of the two doors, and simply clear each room to open another room for the other team (and vice versa); specifically, the rooms open on the death of the Hydra which is summoned from killing the Quantum Minotaurs. In the third room, you should find an Overload Champion, which should be killed, spawning a Tormentor in the central room. Kill the Tormentor, and whichever team’s Overload Champion was just killed will have its Resonant Circuit activated: the circuit’s Source plate will be in the room you found the Champion in, and the Conduit plate will be in an adjacent room. The other team should repeat the process to kill their own Champion and Tormentor, as killing a Champion will despawn the other, so both teams cannot complete this step simultaneously. Each killed Tormentor will re-seal the rooms, requiring killing the Hydras again.
Once your circuit is active, you should ping the energy back and forth as usual until you have generated 9 Pyramidal Resonance (a message will appear in the bottom left once all Resonance has been generated); each person picks up 3: the extra person (add-clearer) should acquire the Resonance from the central room, whilst the plate managers should acquire their resonance from the room they’re in after sending a pulse to the other plate (as they will have a bit of time to do a quick run). Once all players are stocked up on Resonance, you should charge the Conduit (and thus close the circuit) as normal.
Once both teams have charged their Conduits, a Subjugator will spawn in the central room; kill it, and then dunk your Resonance in the Resonant Altar, granting +20s per stack added to the ‘The Final Shape’ timer up to the original time of 4:15.
Repeat the process two more times.
Note: You must deposit at least 1 Resonance each cycle, but you do not need to deposit more (beyond needing more time); thus, the third and final cycle may simply deposit only 1 Resonance in total, if needed.
Encounter 2: Dissipation (Herald of Finality)
This encounter introduces Spherical Resonance in addition to the prior Pyramidal Resonance.
The arena is split into three areas (as you walk in, the leftmost arena is very vertical and more suited to Hunters, whereas the middle and right arenas are more manageable by other classes) surrounding a pit in which the boss roams.
You should split up into three pairs, each pair taking an area for their own, and shoot the Taken blight to begin. Miniboss Taken (Wizard on left, Phalanx in centre, and Ogre on right) will spawn along with various Dread enemies; the Taken Minibosses block your Circuit from functioning. Kill the Taken, and whilst you’re doing so, a player from each pair will be ‘called for battle’ (and receive a Call for Reckoning buff); these players should join the boss in the pit, avoid the Resonant Bees that are flying into it at all times, and shoot the boss’ head to spawn blights in each area. Once the blights are destroyed (look up!), the blight above the boss’ head will disappear and the players in the pit should continue shooting its head until they receive Stolen Favour. This allows them to see the symbol on the Resonant Conduit, and they should return to their side.
Each team should now generate 6 Resonance each with their Circuits, with the player who has the Stolen Favour buff picking up the Resonance matching the symbol on the Conduit, and the other player picking up the others. (Reminder: you only need the last Resonance to be correct. It is helpful to designate specific sets of Resonance to each player, so that you can learn where they spawn and plan your route appropriately.) Once done, the player with Stolen Favour – and thus, the correct symbol – should charge the Conduit and thus close the circuit.
Note: Making a mistake when generating the Resonance (ie, standing on both plates simultaneously or sometimes missing a bounce) will spawn the Taken Miniboss again, which must be killed before the process can be restarted.
Everyone should now head to the end of the pit furthest from the entrance, where a Resonant Altar will spawn; dunk your resonance to extend the timer (up to 3:20), and then DPS the boss. The boss appears to go immune consistently around the 2:30 - 2:40 mark on the wipe timer, at which point you should return to your sides and repeat the process until Final Stand and the boss is dead.
You can have someone use a Sword to try to keep the Herald stationary.
Unlike as described in other guides, the Minibosses do not affect the Call to Reckoning buff in any way.
Encounter 3: Repository
This encounter is a last hurrah to the circuit mechanic for the primary raid encounters, and introduces Hexahedral Resonance (Cube).
You should split into three teams of two, and each room will have three circuits within it (left, middle, right); you should designate a circuit to each team, based on the Source plate.
There will be three Tormentors at the beginning of each room; each team should kill a Tormentor, and the player that lands the final blow will be able to see the symbol on the Conduits. Each team should then generate all 6 Resonance with their circuits, and then we found it best to abandon the circuit to its fate and go collect the Resonance matching the Conduit’s symbol. Both members of the team are picking up the same Resonance. Note that doing this will spawn a Subjugator when the energy bounce is missed, along with a new wave of Scorpii; kill those, then go collect your Resonance without restarting the Circuit. Once all teams have acquired all of their Resonance, each team should restart their circuit just to charge the Conduit and close it properly.
A Resonant Altar will spawn; dunk your Resonance to extend the time as usual, and once done an Unstoppable Incendior will spawn with an add wave by the door to the next room. Kill it and move on to the next room.
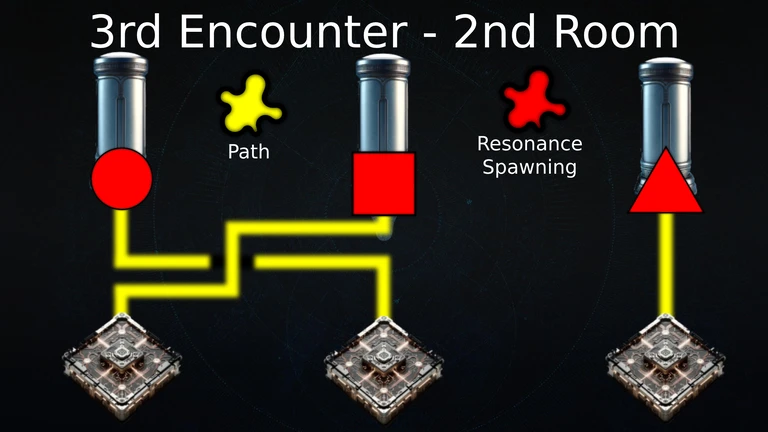
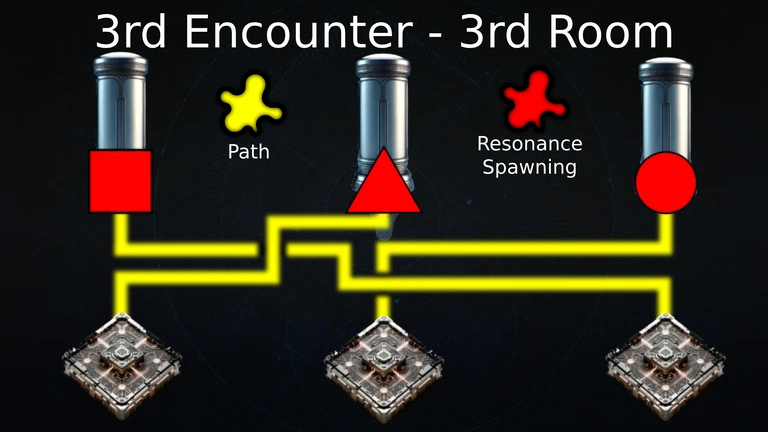
There are three rooms in total, and each room has progressively more complicated circuitry, as shown in the below diagrams by u/Ninqx-:
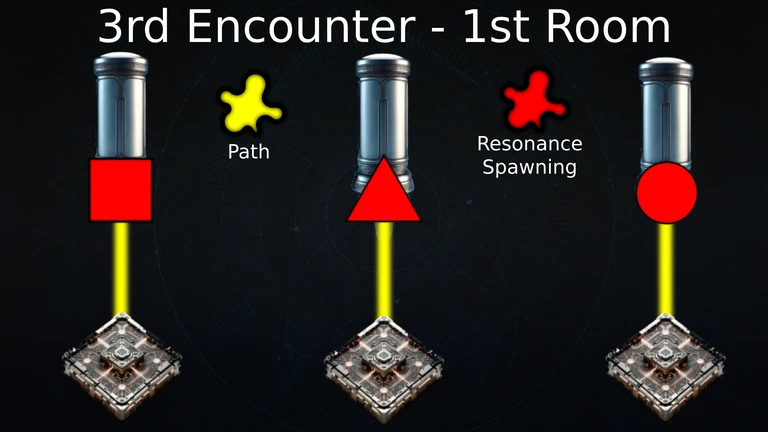

Erratum: Image 2 has the Resonance spawns in the incorrect order; it is actually Square Circle Triangle.


Encounter 4: Verity
This encounter is not mechanically challenging.
As you start the encounter, three players will be teleported to their own rooms which look similar but have a giant glass wall at the back; these are the inside players. The remaining players will be outside.
Shape Combinations


Each room, including outside, will have alternating spawns of Knights and Ogres (where outside Ogres are Unstoppable); the Knights drop a 2D shadow of a shape, which is used for trading and dissection. Note that, once the inside players are ready to leave the rooms, all Knights must be killed both inside and outside.
Inside players
Inside players should start by calling out, in order from left to right, the symbols each statue is holding.
The objective is for each player to have one of each shape that their statue is not holding; the shapes that you currently have are shown as an alternating sequence on the wall.
You can trade symbols by picking up the shape from a Knight, and then ‘registering’ it at a statue. The shape is sent to the room of the Guardian whose statue you registered the shape at. Picking up two shapes at the same time will create a 3D shape; do not do this until you are supposed to!
It is required that your starting two shapes are traded away (‘cleansed’), regardless of whether they match with the end goal. They can then be traded back to you if required.
You can achieve this cleanly by synchronising on each player having two copies of the shape that their statue is holding by trading any symbols you have that do not match the shape your statue is holding to whichever statue is holding it, before then trading one of each to the other two players.
Note: During this stage, the Witness may kill all inside players, and if this happens more than once increasing numbers of outside players will also be killed. See on reviving Guardians.
Once this is done, you should kill both of your Knights and pick up both shapes to form a 3D shape aura, and once outside is ready, can proceed to walk through the now-cracked glass wall.
Outside players
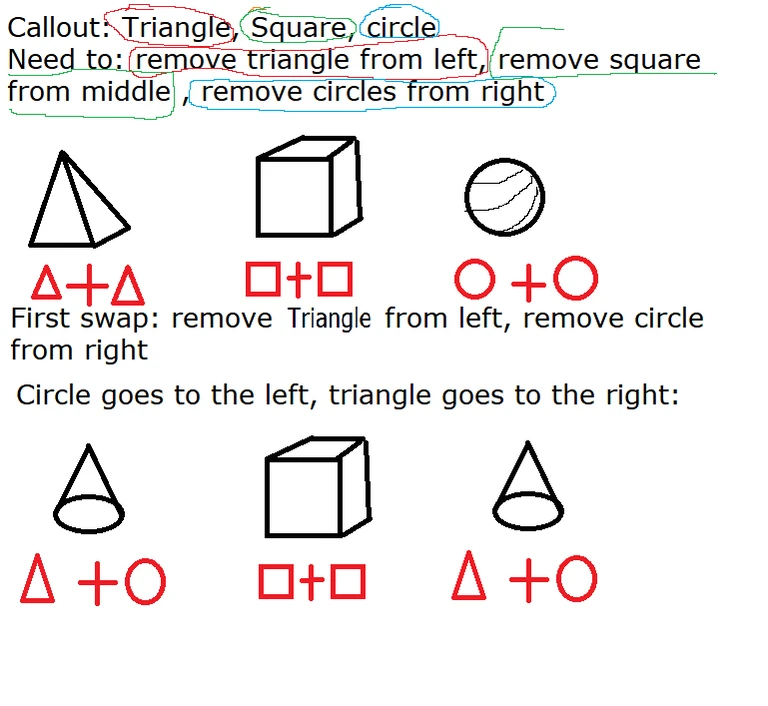
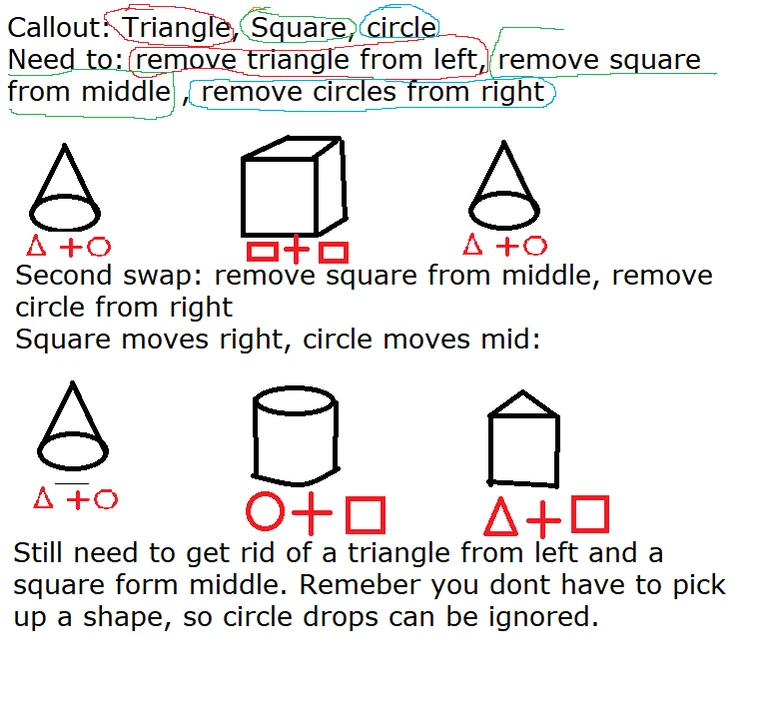
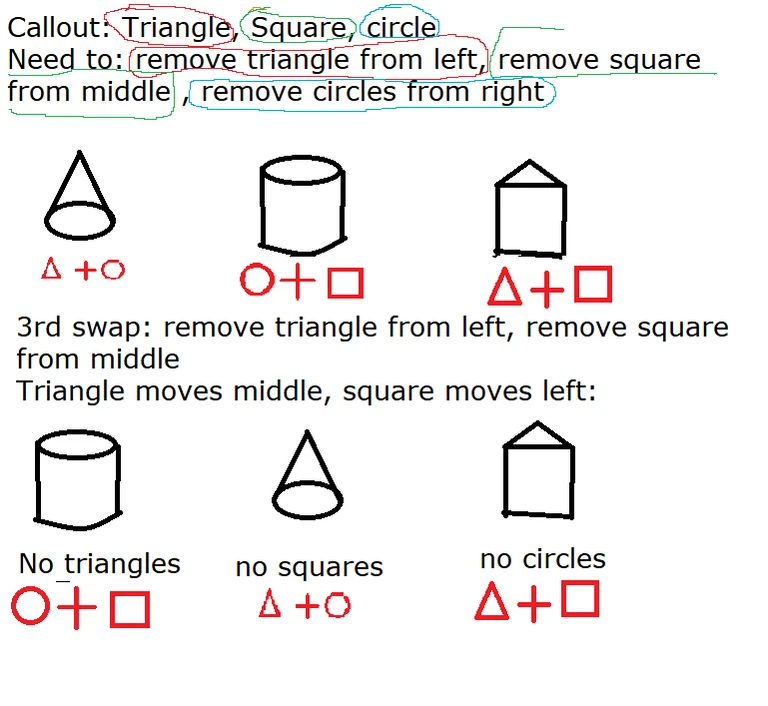
Outside players should begin working on dissecting the 2D shape called for each statue from that statue, such that each statue is holding a 3D shape composed of the other two symbols. To dissect a shape from a statue, you should pick up the shape you wish to remove from it (dropped by killing the Knights), and then do the same with another shape at another statue, which will then swap the 2D shapes on the two statues.
Typically, we found it most useful to have a single player managing dissection, and the remaining outside players would focus on add clear and reviving the inside players as needed.
Once all three statues’ 3D shapes do not contain their respective 2D shape callout from the start, you are ready for the inside players to return; ensure all Knights are dead (again, inside and outside) when they seek to return.
Note: We found it easier to always construct 3D shapes of two different 2D shapes to encourage determinism and facilitate less communication; you should never create a 3D shape composed of the same two 2D shapes yourself.
Example: Outside
(Images courtesy of TheSpitfire from my Fireteam, demonstrating true mastery of Microsoft Paint.)


Once all players reunite
The Witness will kill all but one player, who must revive everyone else. Once everyone’s alive again, the Imminent End timer will disappear briefly, reset, and the entire encounter repeats again two more times.
On reviving Guardians
When the Witness forcibly kills a player, a remaining alive outside player must pick up their Ghost and bring it to the corresponding statue at the back of the outside room. Each dead player will be able to see a glowing silhouette form of one other Guardian (they cannot see themselves) standing on that Guardian’s podium, and should advise the player who has picked up that Guardian’s Ghost on which podium they should deposit at.
Identifying whose Ghost you have is achieved either by memorising who has which Ghost (please use different shells!), or asking whose Ghost matches some description of the Ghost you’re picking up. You should also have distinct fashion between each Guardian, such that you can identify a Guardian from their silhouette.
Protip: A good idea is to number each podium 1 through 6, and for each dead Guardian to type in chat which Guardian and which podium number they’re on as they identify them.
Contrary to what is described by other guides, you do not need to revive players in any specific order.
These rules do not apply to a ‘normal’ death: outside players die as normal, and inside players who die will be revivable outside as the game will teleport an outside alive player to replace them inside.
Aside: Buff names
The 3D shape composed of a triangle and a square (that is, a prism) is called Trilateral by its buff name when you are holding it as a 3D aura.
Encounter 5: Zenith (The Witness)
Split into two teams of three: one focusses on mechanics (‘Glyphs team’) and the other is standard add-clear. The add-clearing team would benefit from being able to deal with Subjugators rapidly.
There are three types of hands:
| Direction it points | Shape | Colour | Attack |
|---|---|---|---|
| Upwards | Circle | Yellow | Bees which attack a circular area nearby |
| Sideways | Square | Red | A long-range beam |
| Downwards | Triangle | Green | Triangular AoE attack centred on a player |
Each member of Glyphs team is focussed on acquiring the Glyphbreaker buff, which appears at the top of the screen. To do so, they will:
- Stand in an area which is being telegraphed as being an attack by one of the three types of hands around the area, and shoot the band on its wrist;
- Stand in the telegraph area for the attack fired off by the hand which has the colour that the band showed until you obtain its Shaped Resonance;
- Return to the original hand and shoot the band again whilst in its attack telegraph area.
Note that after doing this sequence, the Witness may test you; the hand that was just broken will scream, and a series of Resonant Splinters will appear hanging in the air. The Glyph team should note which hand it was they just broke, and based on its shape, shoot the splinters such that the splinters passing through its shape are the only ones remaining, as in the below diagram from u/Mtbarden.

Once done, the Glyph team member will have Glyphbreaker. It’s advisable to now wait until all Glyph team has the buff (unless impossible, as you will have a Resonance debuff that will kill you when it expires); once ready, jump to the centre platform and each shoot a seal on the Witness’ chest. This will clear their Glyphbreaker buff and any Resonance they have. (If any add-clearers have accidentally acquired a Resonance, they should join you on the centre pad to clear it.) At this point, a Subjugator will spawn on each side of the arena.
Shooting the seals simultaneously is advised as it causes only a single pair of Subjugators to spawn for the destruction of the three seals, whereas shooting the three seals at different times is likely to cause separate spawns of three pairs of Subjugators (for a total of six).
Glyph team should repeat their task once more so that the Witness has no seals left, thus triggering DPS and stopping the ‘The Final Shape’ countdown.
During DPS, the centre platform will raise up and a crit spot will open in the Witness’ chest. You should all assemble on the platform as it rises (you may ignore the Subjugators until after DPS, as they cannot reach you), and proceed to damage the Witness.
During DPS, the Witness will be fighting back! It can do a sequence of the following attacks, sometimes rapidly in sequence before providing a brief respite with which to do damage:
- Attack with each hand in sequence (ie, left then right or vice versa)
- The two hands’ attacks are a single overall attack: they will always happen as a pair, and you will have very little time between them. You should prioritise moving out of the way of the next attack as soon as the first is done, though walking speed is sufficient (hip fire is your friend).
- These always attack from the back and then the front.
- Left hand first: safety is found front-right then back-left.
- Right hand first: safety is found front-left then back-right.
- Attack with both hands from directly ahead, which will cover the entire platform.
- This can (and often does) begin during another attack, so you may have to move to another safe area and then immediately jump.
For the first two attacks, you should stand in the non-targeted area and be prepared to quickly swap sides. For the last attack (though note that the Witness is not obligated to do the attacks in this order), you should jump once its eyes flash and the sword-drawing sound is heard. It is advisable to have someone calling out safe zones.
At the end of DPS, the Witness will raise its hands up and then slam them down on the platform – you must ensure you’ve left the platform whilst they’re raised! The platform will lower and the rotation begins again, restarting the ‘The Final Shape’ countdown from the initial time again.
BEWARE: Final Stand is very short - likely shorter than Long Leggy Kicky Boi Rhulk: you are strongly advised to save Golden Guns etc for that on the DPS you expect to tip the Witness into it.
Loadouts?
(Note that this may not remain true if there have been balancing updates since this guide was last updated.)
- Hunters with Golden Gun: Marksman, Celestial Nighthawk, and Still Hunt is very good.
- Warlocks may find Strand + Izanagi’s Burden and a Bait & Switch Cataclysmic works well.
- A Reconstruction and Bait & Switch Apex Predator is always a good shout.
- Prismatic Transcendence grants bonus damage.
- Episode: Echoes features a mod granting bonus damage to allies on Super cast (only if they’re using different Supers!)
- Void Weaken grenades
Note that the damage is rather forgiving; you may observe that we did very little of the above suggestions and succeeded regardless.
Credits
This guide sourced information from our own run through the raid, varied posts as and when specific issues (especially with other guides) arose, and the following existing guides:
Thank you to everyone who contributed to those (especially the first whilst it was being written).